今回はEsloが作成したComposerライブラリを使用し
Laravel&LineMessagingAPIでプッシュ通知を簡単に使う方法を伝授します!
なぜ自作ライブラリを開発したのか?
Lineから以下のようニュースがありました。
「2025年3月31日をもって、LINE Notifyのサービスを終了します」
非常に個人開発、ビジネスにおいて重宝されていた無料で使用できるLineNotify。
私もLineNotifyを活用していたため、強制的にMessagingAPIに切り替える必要がありました。
しかし、Laravelでは簡単にできるカスタムチャンネルを探したところLineはありません!
LineNotifyから移行する人たち、MessagingAPIを使用してとりあえずプッシュ通知だけでも送れるようにしないと!と考えている人達が幸せになれるライブラリを開発しました。
LaravelとLine MessagingAPIを連携してプッシュ通知を送信する
※カスタムチャネルを使用します
1. Composerでパッケージをインストール
composer require notification-custom-line-channel/line-bot --update-with-dependencies2. .envにチャネルアクセストークンを記述
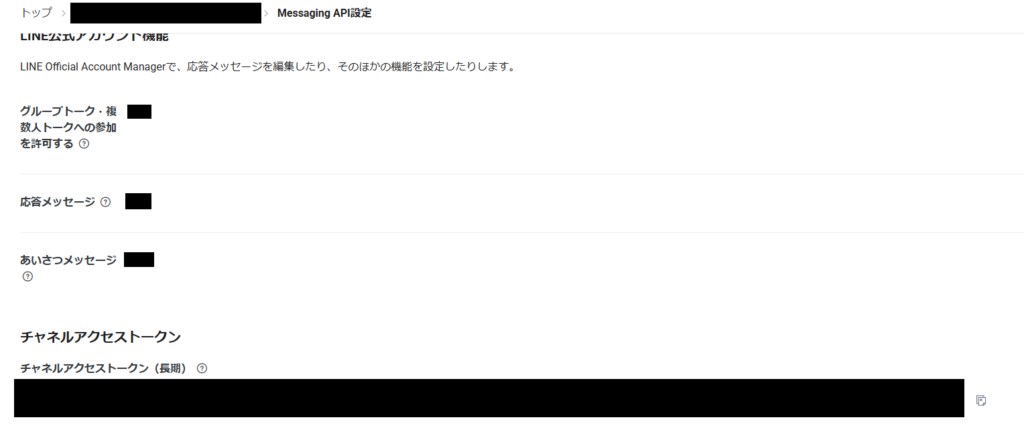
LineDeveloperにログインし
プロパイダー → チャネル設定 → MessagingAPI設定
でチャネルアクセストークンを取得します。

.envにチャネルアクセストークンを記載します。
LINE_CHANNEL_ACCESS_TOKEN="xxxxxxxx"3. config/service.phpにline-botを追記
<?php

return [

    // ...

    'line-bot' => [
        'channel_access_token' => env('LINE_CHANNEL_ACCESS_TOKEN'),
    ],

];
これでプッシュ通知のセットアップは完了です!
本ライブラリの使用方法
送信確認のため、以下の作業をおこないます。
- routes/web.phpにルーティングを記載
- app/Controllers/LineController.phpの作成
- app/Notifications/LinePushMessage.phpの作成
1.routes/web.phpにルーティングを記載
<?php

use Illuminate\Support\Facades\Route;

use App\Http\Controllers\LineController;

Route::get('/', [LineController::class, 'send']);
2.app/Controllers/LineController.phpの作成
<?php

namespace App\Http\Controllers;

use App\Models\User;
use App\Notifications\LinePushMessage;

class LineController extends Controller
{
    public function send()
    {
        $user = new User();
        $user->notify(new LinePushMessage());

        return 'success!';
    }
}
3.app/Notifications/LinePushMessage.phpの作成
<?php

namespace App\Notifications;

use NotificationChannels\Line\LineChannel;
use NotificationChannels\Line\LineMessage;
use Illuminate\Notifications\Notification;

class LinePushMessage extends Notification
{
    public function via($notifiable)
    {
        return [LineChannel::class];
    }

    public function toLine($notifiable)
    {
        return LineMessage::create(
            'line_user_id', // チャネル基本設定のあなたのユーザーIDを記述
            'Hello world.' // 送信したいテキスト
        );
    }
}
Laravelを起動してhttp://localhost:8000にアクセスしてプッシュメッセージが送信できていれば成功です!
php artisan serve
実務では実際どう使うの?
実務だとLine、メール、SMSと一気に送信するケースが多いです。
その場合、どのような実装になるのかを紹介します!
想定ケース:管理画面からキャンペーンを投稿したとき、相手からメッセージが来たときにメールとLineに通知したい。
1.LineControllerを修正
<?php

namespace App\Http\Controllers;

use App\Models\User;
use App\Notifications\CampaignNotification;

class LineController extends Controller
{
    public function send()
    {
        $user = User::find(1);

        $user->notify(new CampaignNotification(
            $user->is_send_email, // メール送信をユーザーが許可しているか
            $user->is_send_line, // Line通知をユーザーが許可しているか
        ));

        return 'success!';
    }
}
2.app/Notifications/CampaignNotification.phpを作成
<?php

namespace App\Notifications;

use NotificationChannels\Line\LineChannel;
use NotificationChannels\Line\LineMessage;
use Illuminate\Notifications\Notification;
use Illuminate\Notifications\Messages\MailMessage;

class CampaignNotification extends Notification
{
    protected array $vias = [];

    public function __construct(
        protected $isMail,
        protected $isLine,
    )
    {
        $this->vias = $isMail ? array_merge($this->vias, ['mail']): $this->vias;
        $this->vias = $isLine ? array_merge($this->vias, [LineChannel::class]): $this->vias;
    }

    public function via($notifiable)
    {
        return $this->vias;
    }

    public function toLine($notifiable)
    {
        return LineMessage::create(
            'line_user_id', // チャネル基本設定のあなたのユーザーIDを記述
            'Hello world.' // 送信したいテキスト
        );
    }

    public function toMail()
    {
        return (new MailMessage)
            ->subject('件名')
            ->view('bladeファイル');
    }
}
このような実装にすれば、以下のコードをキャンペーン投稿時のロジックに組み込めばよいだけなので保守性が高いです。
        $user->notify(new CampaignNotification(
            $user->is_send_email, // メール送信をユーザーが許可しているか
            $user->is_send_line, // Line通知をユーザーが許可しているか
));また、SMSも送信したいとなった場合はapp/Notifications/CampaignNotification.phpのロジックを変更するだけで済むため拡張性も高いです。
参考リンク


